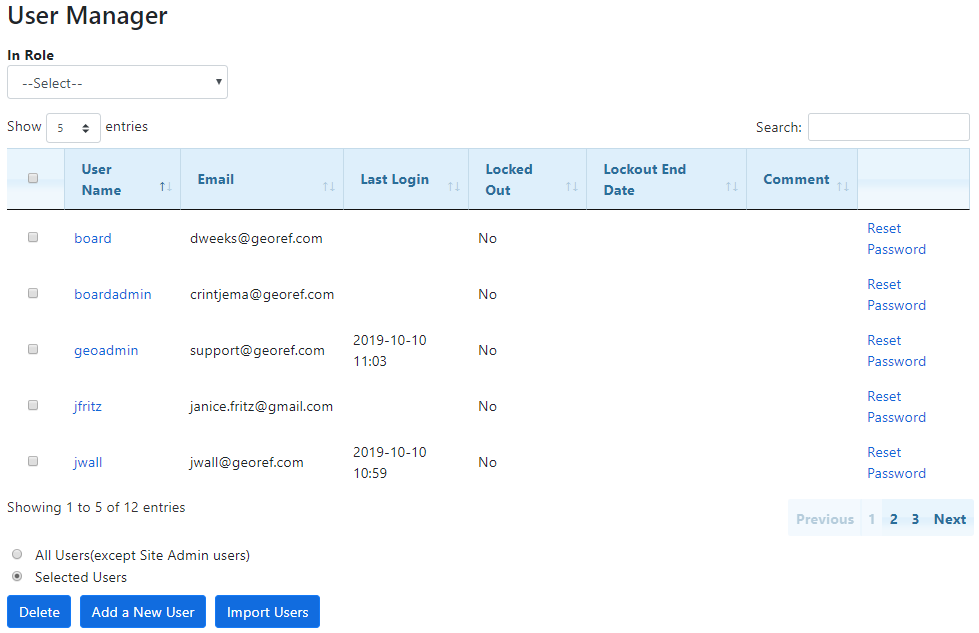
The User Manager allows for the addition, deletion, and editing of the profiles of BusPlanner Web Professional users. With the User Manager, you can:
•Add new users
•Manage the profiles for each user
•Delete existing users
•Reset individual user passwords

 Add a New User
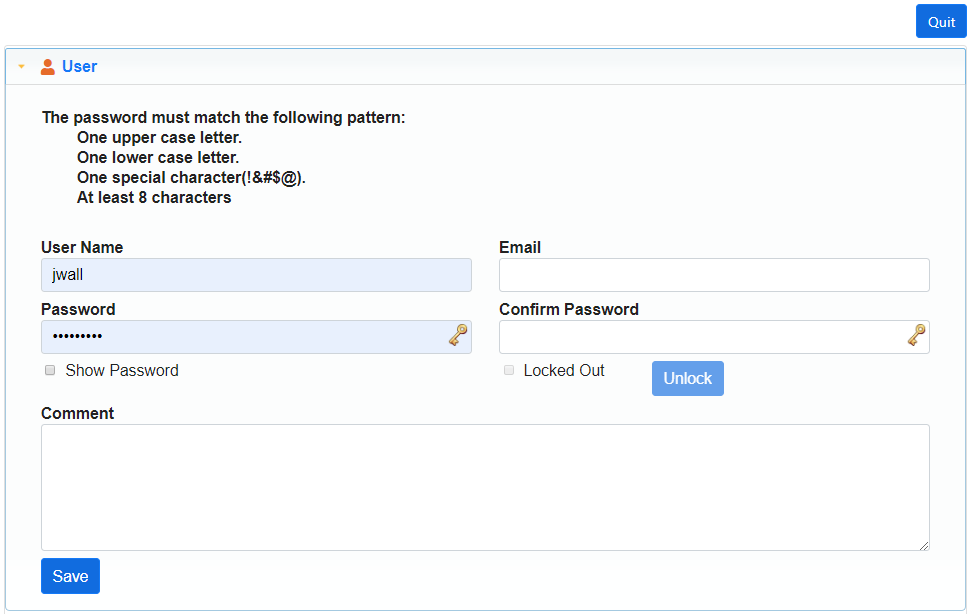
To add a new user, press the “Add a New User” link at the bottom of the user grid. A new page will appear into which the pertinent information for the new user can be entered. You must enter ALL fields in order to be able to create the user.
•User Name - Must be unique for each user, but there is no minimum length. It is recommended that User Names be 4 - 8 characters. •Email - This address will be used by the User Manager whenever passwords are reset. Additionally, when you post an alert, this will send a copy of the alert to that email address. •Locked Out - Generally, it is best to leave new users unlocked. •Password - To change a user's password, type in a new password and then type it in again in Confirm Password below. When you begin to type in a password, the strength criteria will appear above the edit box. (The password requirements can be changed using Settings and Translations. For example,the login password requires a non-letter or digit character if the setting PasswordValidator_RequireNonLetterOrDigit is enabled) •Comments - Users can add additional information in this field. When all the fields have been filled, click Save to create the user. This user will then be displayed in the user list. Note: In order to fully set up the user, however, you will need to add user roles. See Edit a User Profile below. |
 Import Users
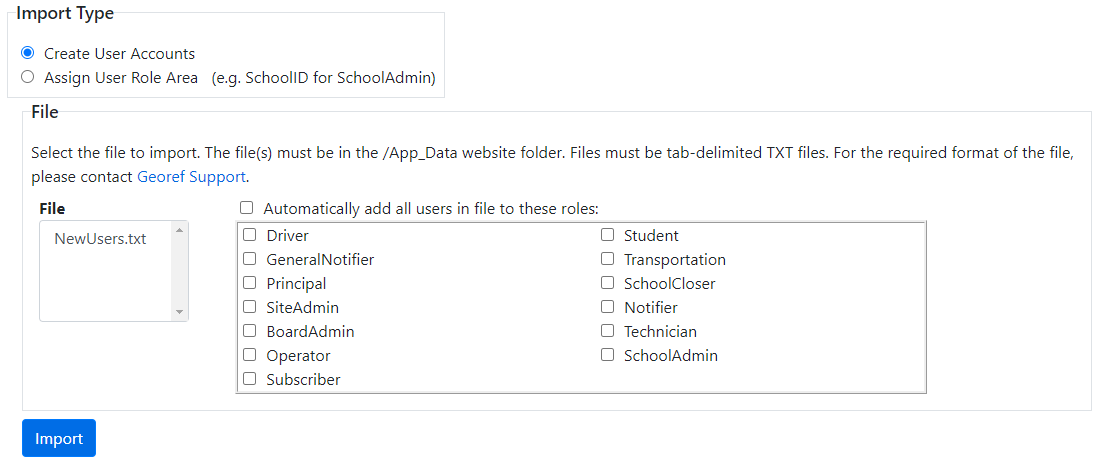
Instead of adding new user accounts one by one, the Import Users feature enables you to import them from an external file. You can use this tool to create new user accounts and passwords, and/or assign accounts to specific roles (e.g. School Administration, Operator, etc.).
The file itself must be in tab-delimited .txt format, and must be placed in the C:/inetpub/wwwroot/BusPlannerSuite/Applications/BusPlannerWeb/App_Data folder on your web server. Once it is there, it will appear as an option in the “Files” window. For specific formatting & field questions regarding the import file, contact BusPlanner Support. Notes: •To import new users or update emails & passwords, the file will need a UserId, Password, Email, School and Operator fields (with those exact heading names in the exact same order) •To Assign User Role Area, the file will need UserId and one of School or Operator, and no other fields. •The School and Operator fields need to be a comma separated list (no spaces) of all school IDs or operator IDs the user has access to, with quotation marks - e.g. "ABC,XYZ" •You can use the tool to update school route change subscriptions by adding the command line flag UpdateSchoolRouteChangeSubscriptions. Contact BusPlanner Support for more details. To import users, click Import. If, for example, you are importing a file containing only school users, check both the Automatically add all users in file to these roles and the SchoolAdmin boxes. |
 Edit a User Profile
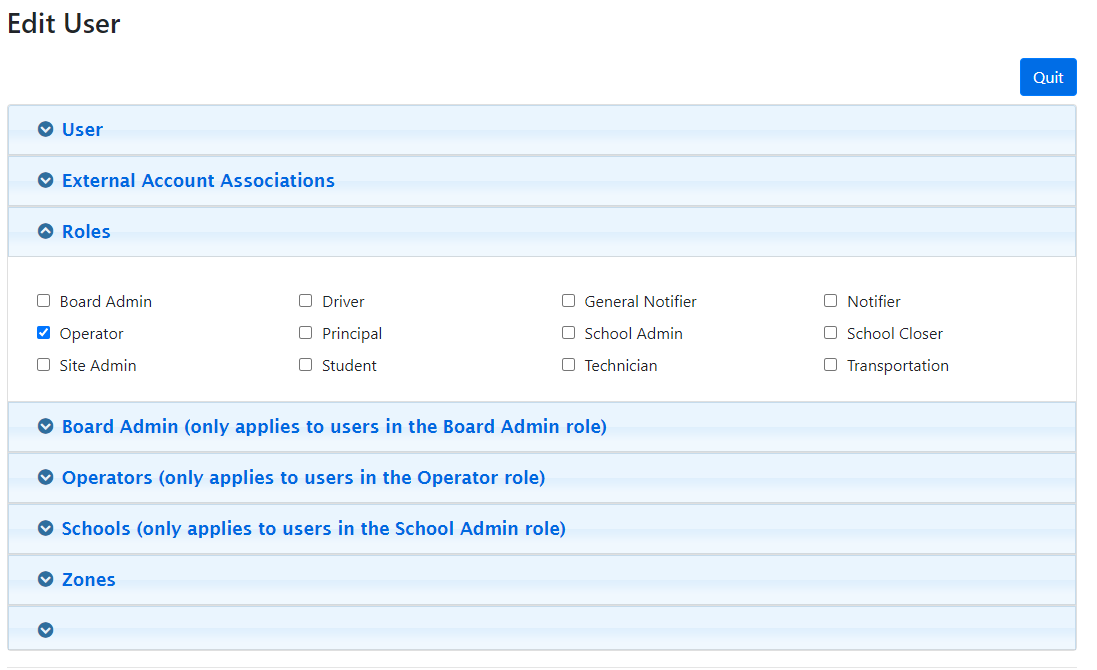
To edit a user’s profile, press the “Edit” link in the appropriate user row. The Edit User Profile page allows you to manage many aspects of each user including: •User Name •Email - It is important that this is accurate, as all reset passwords will be sent to this account along with any relevant alerts. •Locked Out - If this check box is checked, this user is “locked out” due to more than 5 incorrect login attempts on the account. The user can be unlocked by clicking Unlock. •Password - To change a user's password, type in a new password and then type it in again in Confirm Password below. When you begin to type in a password, the strength criteria will appear above the edit box. (The password requirements can be changed using Settings and Translations.) •Comments - Users can add additional information in this field. •User Roles - This defines the functionality that the user will have access to within the BusPlanner Web Professional Facility.
|
 User Roles
For the user to be able to use the Professional Facility, they must be assigned at least one Role. The roles available are as follows: •District Admin - This role is designed for district administrators who will require access to search and view student and transportation data across an entire district. District Administration users can only view schools/students within the selected districts. •Driver - By default, this role has similar permissions as an operator user. Settings can be used to determine which tools, reports a driver user would have access to. •General Notifier - General Notifier users are users who have the ability to post General Notices. •Notifier - Notifier users are users who have the ability to delay or to cancel routes. They can also query history of alerts. BusPlanner Alerts needs to be installed to have this option. •Operator - The Bus Operator role is designed for transportation contractors or operators (including district supervisors if appropriate) who require access to view route data performed by their particular organization. These users can see information only for students riding one of their routes. •Principal - Currently the purpose of this role is for Workflow usage and its function/permissions is exactly that of School Admin in BusPlanner Web. Schools can and should be assigned to principal users for the purpose they were created for Workflow. •School Admin - This role is designed for school administrators who will require access to search and view student and transportation data for one or more schools. School Administration users will be constrained to view only routes/students/exceptions for that school. •School Closer - School Closer users are users who have the ability to post school closings. BusPlanner Alerts needs to be installed to have this option. •Site Admin - Site Administration users are those who have privileges to the administration functions, specifically the Site Administration menu as well as the Alert Settings menu. Changes to these settings will affect all users on the website. As well, they have system wide access to data no matter what other constraints other users may have placed on them. •Technician - This role allows users to have submittals assigned to them in BusPlanner Workflow. •Transportation - The Transportation role has similar access as a Site Admin user. Settings can be used to turn access on or off for different tools. This new user role is intended for transportation staff where full site admin access is not needed.
To specify a role for a user, click the appropriate check box. Depending on the role, a list of checkboxes will appear below the user information box. Check the appropriate box to specify the appropriate school/district/operator to which you wish to provide the user access. Note: If a user role is specified, but no specific constraints are chosen, the user will have no constraints for that role (e.g. a person in the Operator role with no assigned operator name, would have access to all operator information). |
Unused Roles
The following roles are deprecated and should be disregarded:
•NotificationUser
•Student
Delete an Existing User
To delete an existing user, press the “Delete” link on the appropriate row in the user list. You will be asked to confirm the deletion of the user. Once a user has been deleted, it is gone for good; however, a new user with the same User Name can be re-added.
Reset a Password
To reset the password for a user, press the “Reset Password” link on the appropriate row in the user list. This will reset the password to a randomly generated password and email this new password to the email address stored in the user profile. Users can retrieve their password if forgotten by choosing the “Forgot my password” link on the login screen. You cannot change a password for a user. It must be reset.
You can also manually set a user’s password using the “Change Password” option on the Edit User page. The user will need to be separately notified of their new password.
Note: In order for email alerts to be sent, the Mail Settings section of the Web Product Installer must be properly configured.


